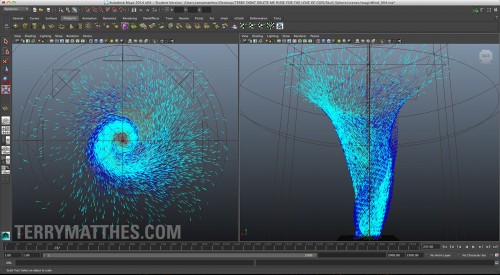
After finishing the fire effect for my project it’s time to move onto the wind portion. To create a tornado the first thing I did was jump into Maya and start setting up emitters in a fluid container. Good lord was that a bad idea. The particle motion to create a tornado consists of a lot more than fire and it’s very hard to control a fluid container with multiple emitters when you don’t know exactly what look you’re going for. After a mornings worth of work I wasn’t where I wanted to be because I still couldn’t identify how my emitters were moving the fluid around. To see anything in real time on my Mac Mini the container settings have to be low. So low that it’s not indicative of the final motion. Not even close. I started to search on the internet and found a good thread on CG Society (http://forums NULL.cgsociety NULL.org/showthread NULL.php?t=1040698) where an artist responsible for clouds and tornadoes in Resistance 3 had made a few posts. I was pointed towards using a regular particle setup to nail the look and then control the fluid container with those particles. Brilliant!
In the afternoon I created my particle tornado. It consists of 5 emitters. One large torus emitter to create the center of the tornado and 4 smaller cylindrical volume emitters placed around the base to simulate the upward streams of air you get that contribute to the storm. Beyond the 5 emitters there are a total of 4 force fields that create the motion. The first force field is a uniform field that pushes the particles straight up. This is similar if not the same as a gravity field with a +Y force. The second field is a cylindrical vortex volume. This volume spins the particles while keeping them in a cohesive shaft. The third field is a cylindrical axis volume field. This is what makes the tornado spread outward from top to bottom. I’ve set it’s “around axis” attribute to X0 Y1 Z0. This tells the particles to spin around the Y axis. The attenuation value on this field is set higher so that the particles don’t instantly push out to the edge of the volume.
Attenuation acts like an ease in and out of the volume. If you set the attenuation value to zero on any field the particles will take on the motion of the volume as soon as they enter it’s space and this can create abrupt changes in direction. The final volume is a spherical volume axis field that has been squashed and placed atop the cone to push the particles outward. I’m using the “away from axis” set to X0 Y1 Z0 to achieve this.
For the first hour or so I really struggled to get the particles to follow a nice swirling motion and then I discovered my mistake. I have to set the particle’s (not the emitter’s) “conserve” value to 0. This stopped the particles from inheriting any initial motion and gave the force fields full control. If you don’t do this it’s an uphill battle to control their initial momentum. Now that I have my particle system down the next step is to create a fluid container that these emitters will be parented to. I’ve been told that since Maya 2011 particles and nParticles have been able to emit voxel data into a fluid container. Well see how well that goes…
 (http://www NULL.terrymatthes NULL.com/wp-content/uploads/2013/12/terryTornado NULL.jpg)
UPDATE
I got my particles emitting voxel data to the fluid container in Maya. I forgot to turn buoyancy off of the fluid container so the particles keep going up past the top of the funnel, but I’ll fix that on my next go. The fluid container is using the density information to shade the particles.
Comments (0)