« Posts tagged paint

[R&D] RenderMan Still Life

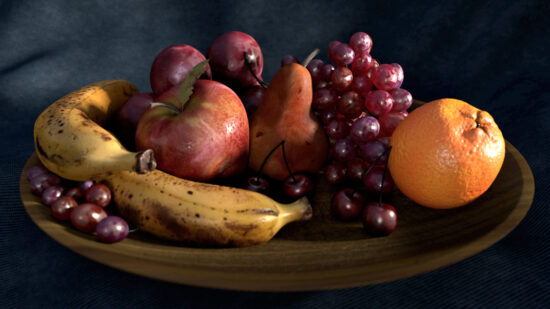
CG Fruit Bowl

CGChallengeOne (http://www NULL.terrymatthes NULL.com/wp-content/uploads/2018/08/CGChallengeOne NULL.jpg)
The models for everything in the scene were taken from 3DRender.com as part of their Lighting Challenge #1. I wanted to visit this challenge once more as a test of the free Renderman render plugin for Maya. The challenge is that you are given the 3D models to work with and your job is to texture, light and render the scene. Choice of lens and camera position are left up to the individual. I thought the plugin was fairly easy to work with and had a decent realtime render mode via CPU.

Workflow

  • Clean the geometry
  • Layout the UVs in Maya
  • Import UV’ed objects into Zbrush
  • ZBrush/Spotlight and photo references to paint fruit
  • Stage in Maya
  • Surface and light with Renderman

Photography

The photographs were taken in a lightbox using a camera mounted above it facing downwards.
I constructed the light box from white posterboard. The box itself was facing with the open side upwards. Then the camera straddled the box and the camera was underneath the tripod to shoot straight down. These are some samples of the raw shots

I later brought shots like these into Photoshop to remove an strong lighting info. I had one small setback when I was editing the photos. They had more grain than I anticipated, and it made it a little more difficult to fix some of the lighting info. Overall I was really happy with the results.
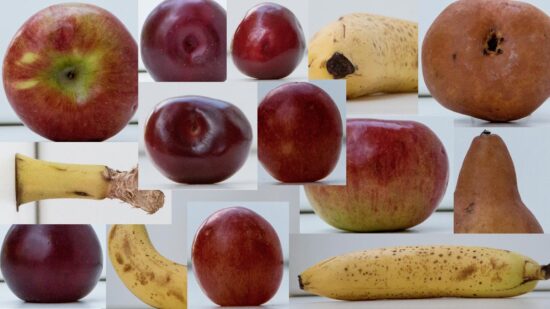
Fruit Collage (http://www NULL.terrymatthes NULL.com/wp-content/uploads/2018/09/fruitcollage NULL.jpg)

UV Work

The majority of the shapes are spherical in nature, so the UVs followed and were produced with spherical projections. I did want to try something different on the banana though. I cut the bananas along their natural edges and then squished them out of the peel. After the peel was flattened I snapped a shot. Later on in Maya I formed the UVs around the image. The bananas turned out great and I feel this was a big part of why.
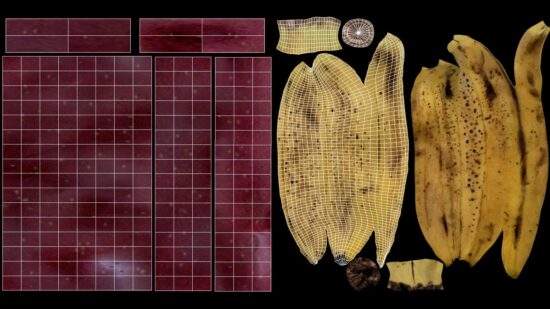
fruituvs (http://www NULL.terrymatthes NULL.com/wp-content/uploads/2018/09/fruituvs NULL.jpg)

ZBrush / Spotlight

ZBrush is always fun to work in. I think that’s one of the programs big wins. Before Substance Painter came along it was a great way (and still is) to get your assets textured. Being able to resample areas of textures to stamp using Spotlight feels awesome. It lets you mix and match details from several different photos with ease. Painting your objects in 3D is such a liberating feeling when compared to painting in 2D.
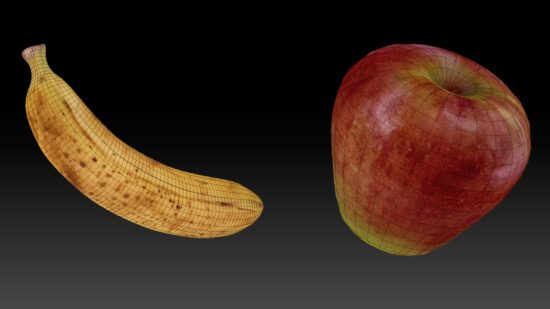
fruitZbrush (http://www NULL.terrymatthes NULL.com/wp-content/uploads/2018/09/fruitZbrush NULL.jpg)

Lighting / Surfacing

There are two spotlights in the scene the key light is on the far right. It’s pushing through a large light blocker with a windows shape punched out. The fill light coming from the left of the photos is doing it’s job of pulling the shadows up so they appear softer. The surfacing of the fruit was easier to do in Renderman than previous render plugins. I found that the ability to control the second specular lobe made a huge difference. Although it isn’t necessarily physically correct that doesn’t matter in this instance. The interactive rendering you can do with even just your CPU for Renderman is pretty good. The one thing that really superised me with Renderman was the render settings you have to play with. Compared to Vray, or really any other render plugin out there it’s fantastic. There are a few confusing things like the colour you get when using Sub Surface Shading, but it is explained in the online documentation.
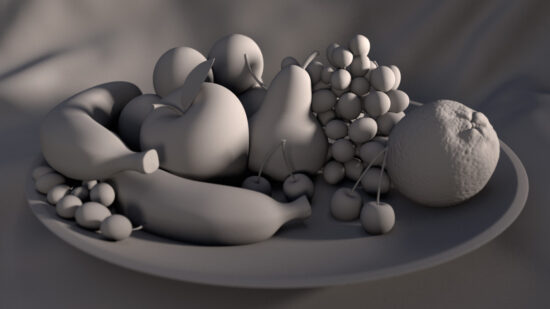
lightingFruit (http://www NULL.terrymatthes NULL.com/wp-content/uploads/2018/09/lightingFruit NULL.jpg)

Conclusion

Overall I would recommend RenderMan to anyone who wants to free their artistic mind and get away from being bogged down with technical details.

[Game] UDK Windy Grass

Windy Grassy Plain

Windy Grassy Plain (http://www NULL.terrymatthes NULL.com/wp-content/uploads/2013/03/windyplain NULL.jpg)Making grass move in the UDK isn’t overly complex but it does requite a decent handle on Maya and the Unreal Development Kit’s material editor. The concept at it’s core is to use the Material Property “world offset position” to make your grass wave. Control of the grass is split between three different systems: the “wind directional actor”, the material network we create for the grass, and our grass mesh’s vertex colours.

Maya

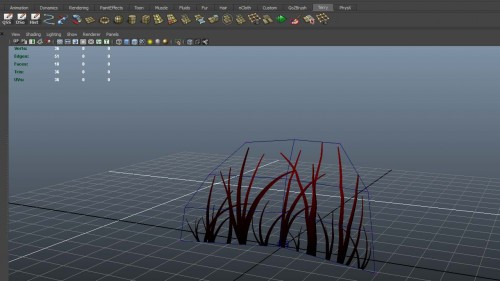
Our verdant journey starts here. I’m not going to go over modeling a grass plane, but if you have any trouble you can just take a look at the one I made here to see the relative complexity of the mesh.

Maya Grass Plain Mesh (http://www NULL.terrymatthes NULL.com/wp-content/uploads/2013/03/grassmesh NULL.jpg)

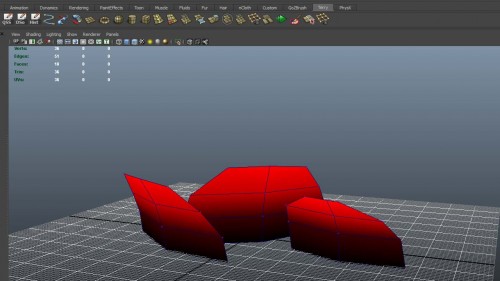
After you have created your planar mesh you’re going to need to jump into painting “vertex colours”. Vertex colours are literally just RGB values you’re painting on your mesh’s vertices through Maya’s vertex painting system. Before you go all nuts painting up your mesh you’re going to have to change a few of Maya’s options to ensure that vertex colours will appear properly in your viewport. The steps for enabling vertex painting can be found on Autodesk’s help site here (http://download NULL.autodesk NULL.com/us/maya/2010help/index NULL.html?url=Coloring_polygons_Make_vertex_colors_visible NULL.htm,topicNumber=d0e213327). After you get vertex colours working you can move on to the next step which is painting (http://download NULL.autodesk NULL.com/us/maya/2010help/index NULL.html?url=Coloring_polygons_Assign_colors_to_polygon_vertices_by_painting NULL.htm,topicNumber=d0e213575) a red gradient from the bottom of your mesh to the top. Lower red values will cause the vertex to be less affected by wind. Below I’ve placed a couple more grass planes along with the original.

 Vertex Painted Grass Meshes (http://www NULL.terrymatthes NULL.com/wp-content/uploads/2013/03/vertexColors NULL.jpg)

After your painting is complete you are ready to export your mesh for the UDK. You don’t have to do anything special on export in Maya to carry your vertex colours into the UDK just export your grass plain as a standard FBX.

Unreal Development Kit

Our mesh is done and it has all the properties it needs to accept directions from the “world offset position” in the material node we’re going to create. The first thing to do is start a new map and import your materials and models for your grass. After everything is imported create a new material.

In this material up with whatever diffuse, normal, and specular etc. that you need and then clear a fair amount of space in your material editor because node network we are going to create for wind is going to take up a bit of space.

Before we create the windy section of the material I wanted to break down the core of the wind network. I mentioned earlier we are using the “world offset position” attribute in our material  to animate the grass. As you can imagine, feeding the world offset position a constant value would yield no animation. We need some way to animate the actual value we are sending to the world offset position.

To accomplish this we are going to use two nodes. The “Sine” node and the “Time” node. The time node will give us the changing value we need. Plugged into the sine node we can create a continually oscillating value between 0 and 1. This is the same principal I used to animate optical flares in my previous post (http://www NULL.terrymatthes NULL.com/unreal-2/materials/sprite-channel-controller/).

Next we need a way of incorporating the red values of our vertices to control the wind falloff on our grass mesh.

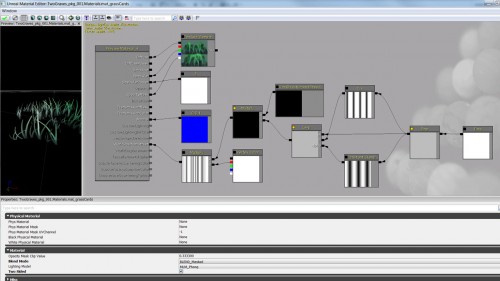
The wind instructions to affect the grass are going to come from a “Wind Direction” actor. Your going to need to put on in your scene and they are located in the classes hierarchy tab. When you bring up it’s properties you’ll see that there are a few different controls that we can use to affect the wind. Be sure to play around with these so you can get a good idea of how you’ve weighted your vertices after the network is complete. Beyond the diffue map, there isn’t anything in the network that you can’t grab directly from the right click menu in the material editor. Go ahead an copy the network below, then assign it to your mesh.UDK Windy Grass Material Network (http://www NULL.terrymatthes NULL.com/wp-content/uploads/2013/03/windyGrassNetwork NULL.jpg)

After updating your material network you should see the grass now waving at a constant rate in the wind. After this it’s up to you to discover some more interesting ways to make your grass move. Also take a minute or two and think about all the implications of this technique. There are a lot of things in video games you could apply this type of procedural animation to.

Conclusion

If you have more than one mesh that will use wind you should really look at setting up your material so it can be used for instancing. This material network can get large and loading it in for each plant is going to cause you some performance loss.

I hope this gave you a good understanding of wind principles and showed you a new way to spice up your Unreal Development Kit environments.

If you’re stuck on a particular step or want to know more about creating material instances ask away and I’ll do by best to help :)

[Game] Tombstone WIP 3 – Cloth

Maya Cloth Skeleton

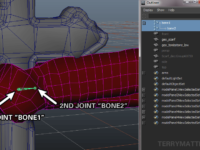
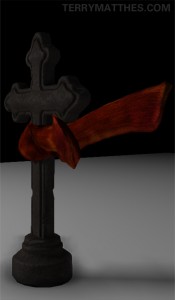
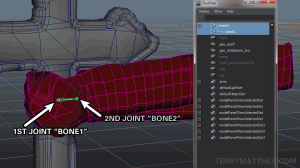
Blowing Scarf (http://www NULL.terrymatthes NULL.com/wp-content/uploads/2012/12/tombscarf NULL.jpg)Since my last update I’ve added a cloth skeletal mesh to the scene. Cloth inside the Unreal Development Kit is something I’ve always wanted to take a look at.  After watching a quick tutorial over at 3D Buzz (http://www NULL.3dbuzz NULL.com/vbforum/sv_showvideo NULL.php?v=3830) I was ready to start setting up my cloth in Maya. The video is good, but it skips the entire rigging process and starts with a pre rigged 3D plane brought into the UDK. I looked around on the internet for some Maya specific tutorials, but there weren’t any. The first thing that caught me while working this out was the use of the term “bone“. A lot of the tutorials instruct  the reader to add two bones to the mesh. In Maya you don’t really lay down bones. You’re laying down “joints” and what I would consider the bones are the shapes Maya creates between those joints. Before you start you’re probably going to want to jump into Maya’s Animation tab so all the rigging tools are on your shelf. The first step in Maya is to place two joints in a chain along the X axis fairly close together. The next step after you’ve created these joints is to use a “smooth bind” to pair the joint chain with your mesh. That command is under the Animation Menu > Skin > Smooth Bind. Now with the joint chain bound to your mesh you can begin to “paint” your vertex weights. After being bound each joint in the chain stores a separate value for each vertex. Every individual vertex value lets the joint know how much influence it should have over that particular vertex. A value of 1 means the joint would act upon that vertex with 100% of it’s influence (or movement). A value of 0 means that the vertex will not follow that particular joint at all. Below I have a diagram showing how your joints should be setup and named. UDK will later ask us which bone we want associated with the cloth movement.Maya Cloth Skeleton (http://www NULL.terrymatthes NULL.com/wp-content/uploads/2012/12/bonesetup NULL.png)

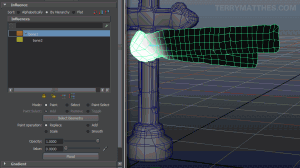
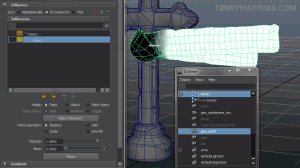
Now that the mesh is rigged go into “Object Mode” and use the right click menu to access the “Paint Skin Weights Tool“. Make sure you have textures enabled in your viewport when you’re doing this. You also have to be in the “Default Quality Rendering” mode under your perspective views “Panel” menu to see the weights change as you paint. The first joint “bone1” is going to be associated with all the parts of your cloth mesh you don’t want to move. For my scenario I have painted all the vertices of the knot white and all the vertices of the two scarf arms black. I do this because I don’t want the knot to move at all.  I’ve included two diagrams below to show the weighting of my vertices to both bone1 and bone2.Bone one Weights (http://www NULL.terrymatthes NULL.com/wp-content/uploads/2012/12/bone1 NULL.png)Bone Two Weights (http://www NULL.terrymatthes NULL.com/wp-content/uploads/2012/12/bone2 NULL.png) After you’ve weighted your vertices you can export the mesh as a FBX for import into the UDK. On import the UDK should recognize your mesh as a skeletal mesh and give you a different window type when it’s opened up through the UDK Content Browser. After import there are a few properties you need to activate in your mesh.

First you need to open up your cloth mesh in the content browser. You should now have the AnimSet Editor open. This is because UDK is treating our cloth as a “Skeletal Mesh“. The first property we want to activate is “Force CPU skining” this will tell the UDK that we want our mesh to be treated as a cloth. It’s found under the “Skeletal Mesh” roll out in the “Properties” pane. The second and final property we need to change is under the “Cloth” roll out. When there expand the “Cloth Bones” roll out and hit the green cross to add an entry to the Cloth Bones list. Now click in the name space for that entry and call it whatever you named the second joint in Maya. In my case it was “bone2”. With this done you’re now ready to place your mesh into your game scene.Cloth UDK Mesh Properties (http://www NULL.terrymatthes NULL.com/wp-content/uploads/2012/12/Scarf NULL.png)

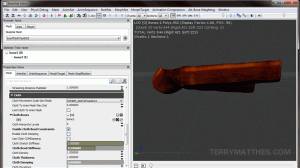
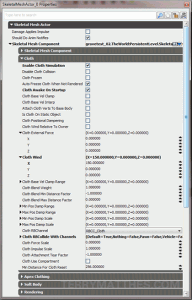
Make sure your mesh is selected in your content browser and then right click in one of your views so that you may add your mesh to the scene. Once your mesh is in the scene you need to change a couple of it’s properties that we couldn’t access from the AnimSet Editor window earlier. Under the “Skeletal Mesh Actor” roll out there is a sub section called “Cloth” expand this. Under here we can Cloth In Game Mesh Options (http://www NULL.terrymatthes NULL.com/wp-content/uploads/2012/12/Scarf2 NULL.png)see the first option “Enable Cloth” and a lower option called “Cloth Awake On Startup“. Enable both these options. As an optional step you can play around with the wind values to try and get your mesh to receive a constant blowing force. To now see your cloth in action you can rebuild your map and launch the level, or simply right click in the perspective viewport and chose “Play From Here“. Cloth doesn’t animate in the viewport’s “Game Mode“.

That’s it for this Tombstone project. I hope anyone following along found some cool tips to help them get a little more out of the UDK.

Cheers,

Terry Matthes

Zbrush Concept

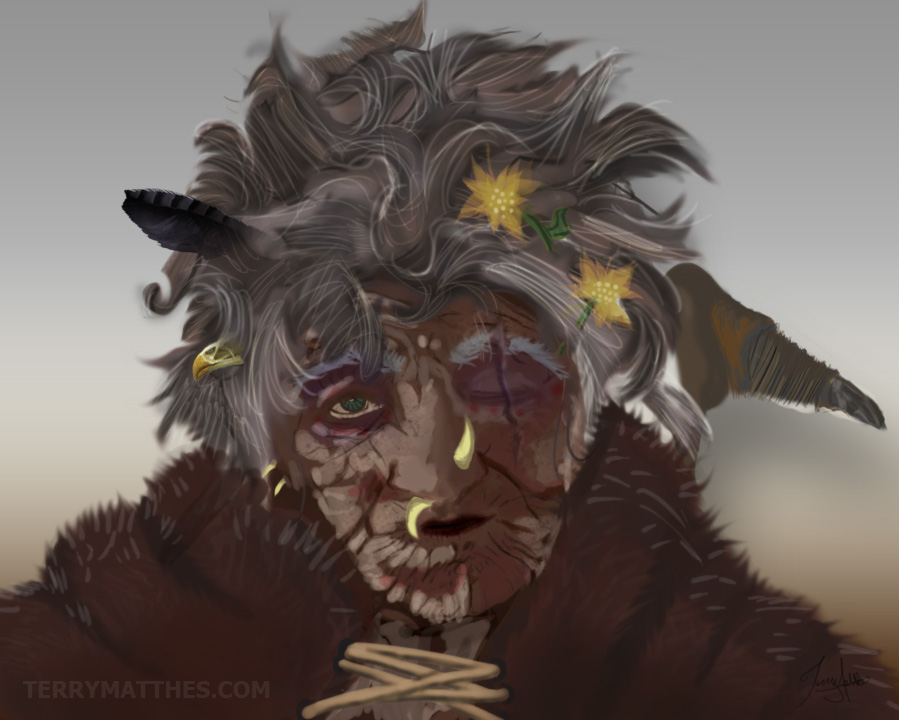
Concept for female corrupt elderly prehistoric explorer

D&D style attribute rolling for character modeling… WTF? Yes that’s right, our latest assignment involved rolling character attributes to create out next sculpt. After our attributes were fleshed out we had to do a portrait of the character. I lucked out with the following stats.

Gender: Female
Age: 41-60
Job: Explorer
Time Period: Prehistoric
Disposition: Corrupt

Well here is the sketch I came up with after a few hours. I did some loose painting in Photshop after scanning my initial sketch in. Over the next couple of weeks I will be posting the upated sculpts of the character. The whole sculpt and paint is due on the 12th of December.
Concept for female corrupt elderly prehistoric explorer (http://www NULL.terrymatthes NULL.com/wp-content/uploads/2011/11/Terry_Explorer_V2 NULL.jpg)