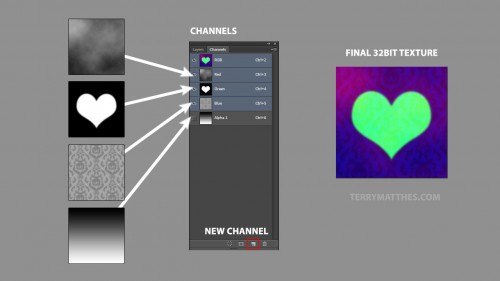
Whaa, hugh? What the heck is it? Well grey packing refers to creating textures in photoshop that in and of themselves are not particularly useful, but each channel of colour, and possibly even an extra alpha channel contain useful grey-scale textures.
Think of the complete texture as a container or vehicle for getting as many materials as you can into your game or application as efficiently as possible.
A lot of materials use grey-scale textures for values. If you create a 32 bit image (targa for UDK) you can stack 4 grey-scale images into your file and that’s decreasing your memory usage by 300%! and using one quarter of the draw calls for those materials.
 (http://www NULL.terrymatthes NULL.com/wp-content/uploads/2013/04/graypacking2 NULL.jpg)
To do this just go into your channel tab (next to layer) in Photoshop and you’ll see your four channels and their composite channel at the top. This is where you are going to copy and paste your grey images into. If you want another channel just create one with the new layer button. By default this channel is called “Alpha”.
Don’t forget to export as 32bit otherwise you’ll lose that extra alpha channel.
Cheers
Comments (0)