Introduction
Prerequisites
Maya opticalFX Sprite Textures (http://www NULL.terrymatthes NULL.com/particles/maya-sprite-textures/)
In our past lesson we created 3 different sprites and a gradient mask. Then we put them all into one texture using channels. This lesson will use that texture as a base for a material network. This material network will let us create instances of our base material that will have variables we can change. We will be able to change the inside colour, outside colour, saturation, core brightness, and sprite textures themselves. We’ll start by importing our texture into the Unreal Development Kit. If you don’t have a texture ready to go please run through our last lesson (http://www NULL.terrymatthes NULL.com/particles/maya-sprite-textures/) to get one setup.
Unreal Development Kit
Importing Texture
Let’s bring up the Content Browser (ctrl+shift+f) inside of the UDK and click the import button at the bottom right to bring in our texture. Under the import options for our texture we want to select “TC_SimpleLightmapModification” as the “Compression Settings” and label the group “Texture”. I find that TC_SimpleLightmapModification is the only section that doesn’t degrade the sprite texture channels. Now that we have our texture imported lets go ahead and create a new material. Right click in an empty area of the Content Browser and select “New Material” name it whatever you wish and call it’s group “Material”.
Below is the network we are going to create. We’ll break down each node grouping and explain the elements one by one. You’ll notice that in place of regular constant vectors we have placed scalar parameters and vector parameters. This will let us manipulate these values outside of the Material Editor. All “Parameter” nodes have a “Value” this is what identifies them in the material instance we will create later. You must fill the Value names in and make sure they are unique or you will get nodes sharing values and that isn’t good.
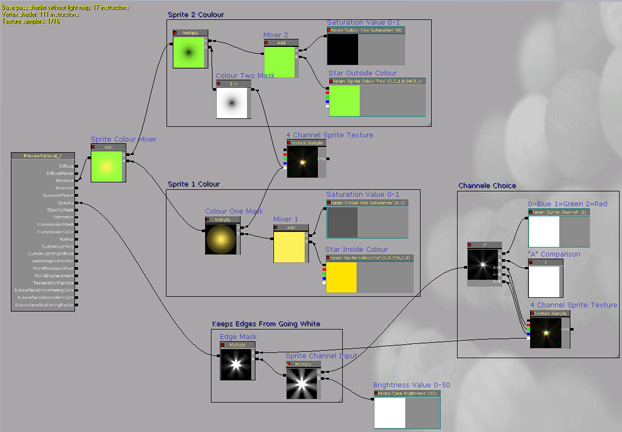 (http://www NULL.terrymatthes NULL.com/wp-content/uploads/2011/01/p_101_channelController_network NULL.jpg)
Before we jump into the individual node groupings I just want to drop down a copy of our sprite texture. Select the sprite texture in the Content Browser, hold down the “t” key and click in the Material Editor.
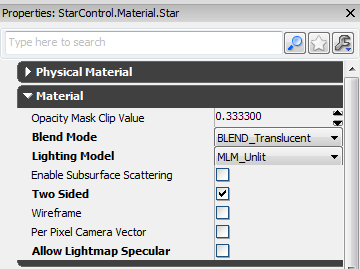 (http://www NULL.terrymatthes NULL.com/wp-content/uploads/2011/01/p_101_channelController_matprop NULL.png)The material we are creating is going to be partially transparent and double sided. We need to change some options in the materials properties to reflect this. First click on the material body and then click the “Material” rollout to expand it’s options. Change the “Blend Mode” to “Blend_Translucent” and check the “Two Sided” option.
Make sure you add descriptions to your nodes inside the Material Editor. You can do this inside the node’s properties under “Description”. You’ll want to do this to most nodes along the way so you don’t end up with a mess of nodes later on and have no idea how each functions.
Inside Colour
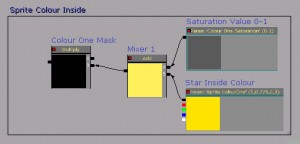 (http://www NULL.terrymatthes NULL.com/wp-content/uploads/2011/01/p_101_channelController_inside NULL.jpg)To build this grouping we are going to drag out the following nodes onto our canvas: Vector Parameter” Scalar Parameter, Add (“a” key) and Multiply (“m” key).
Hookup the output on both the Scalar Parameter and the Vector Parameter to the input of one of the Add nodes. Label this add node “Colour Mixer Inner”. The Vector Parameter will help you choose your inner colour. The Scalar parameter will control how saturated the colour is. 0 will leave the colour at full saturation while 1 will wash it out to white. If you want any white at all in the highlight you’ll want to set this to at least 0.1.
Take the output from the Add node we were using and plug it into one of the inputs on our Multiply node. Now plug the alpha channel (white tab) from our sprite texture into the remaining input. This will mask the inner colour off so it fades towards the edges of the sprite image.
Outside Colour
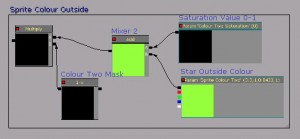 (http://www NULL.terrymatthes NULL.com/wp-content/uploads/2011/01/p_101_channelController_outside NULL.jpg)The outside colour is setup almost the exact same way as the inside colour setup except we are going to reverse the alpha channel gradient of our texture using a “One minus” node. Ctrl+alt drag over the entire inner colour setup and Copy it (ctrl+c), then Paste it (ctrl+v). Now drag out a “One Minus” node from the “Math” section of our Material Expressions menu on the right. Connect the One Minus node in between the Multiply node and the Alpha channel(white tab) of the sprite texture.
The last thing we are going to do with colour is hook these two systems up to the “Emmisive” input on our material. Drop an Add node down and connect the output of both system’s Multiply nodes into either input. This will add the outside and inside colours together by blending the two gradient masks.
Core Brightness
The core brightness will be controlled by a single Scalar Parameter. I suggest using a brightness value of 0-50. Your range might vary though. It really depends on the overall brightness of your channel images.
 (http://www NULL.terrymatthes NULL.com/wp-content/uploads/2011/01/p_101_channelController_chooser NULL.jpg)Channel Chooser
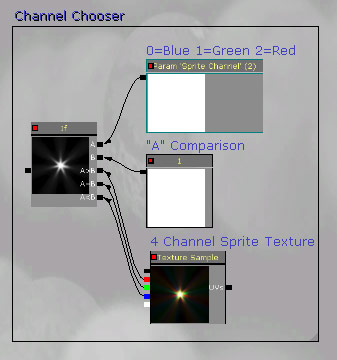
Our channel choosing system will revolve around an “If” node. The “If” node allows us setup a greater than, less than, equal to statement that we can use to choose our texture channel. Drag out an “If” node, a Constant1Vector (“1” key), a Scalar Parameter, and an extra copy of our sprite Texture (“t” key).
Set the Vector1Component’s value to 1 and connect it to the “B” input of the “If” node. Connect the Scalar Parameter to the “A” input and set it’s value to “1”.
Connect the red green and blue channels of your sprite texture node to the “If” node as follows:
- red = A>B
- green = A=B
- blue = A<B
Now that our “If” node is setup we can switch between channels. A Scalar Parameter value of 2 will give us the red channel, 1 gives us the green channel, and 0 gives us the blue channel.
Edge Masking
Our last section will consist of two Multiply nodes. Drop 1 down and connect the Scalar Parameter output from our core brightness into input B. Connect the output of the “If” node into input A.
Drop down a second Multiply node and connect the first Multiply node into input B. Now connect the alpha channel (white tab) of our sprite texture into input A. Lastly plug the output of this Multiply node into the Opacity input of our material. Be sure to save your material by pressing the green check mark at the top right now that everything is complete.
Material Instances
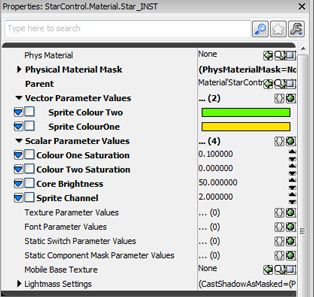 (http://www NULL.terrymatthes NULL.com/wp-content/uploads/2011/01/p_101_channelController_instance NULL.jpg)Material instances are a good thing. They save us resources by changing materials already stored in memory. The more resources we have the more cool things we can show people :) Let’s create a material instance of our Sprite Material by right clicking on our material in the Content Browser and select “Create Material Instance (Constant). Rename the instance if you wish. Next to our original material you should now see the instanced version of our material. Double click it to open it. On the right hand side you can now see the Vector and Scalar parameters we setup in our material. Click them on to make them active. Now you can change them and from Kismet as well :)
Conclusion
As you can see instances can give us a lot of control over the look of our materials. By just inserting some “Parameter” nodes in the place of Constant Vectors we can change the look of our sprites quite considerably. You can take this network a lot further by adding if nodes and Scalar Parameters to overlay channel images. If you feel up to it go ahead and try playing with the “Sin” node and “Time” node to make your sprite glow! I’ll give you a hint: fluctuate the core brightness :D
Further Reading
Hourences Intro to Cascade (http://www NULL.hourences NULL.com/tutorials-ue3-cascade)
Program Shortcuts Used
Unreal Development Kit
Copy (ctrl+c)
Paste (ctrl+v)
Content Browser (ctrl+shift+f)
Add node (“a” key+mb1)
Multiply node (“m” key+mb1)
Texture node (ctrl+t)
Comments (0)